Installing and Configuring Samba Server in Red Hat Linux 7.1 on a Windows 2000 Domain
[NOTE: I also got Samba 2.25 to work on a Windows 2000 Domain via Red Hat 8.0. If you want the configuration file, substituting your network-specific data as needed, Go Here. It is still feasible to follow through with the instructions below. There are some differences with the newer RH and Samba, but it is configurable afterward as needed.]
I write this basic Help Document due to the sometimes troubling Samba Server configuration instructions available on the Internet. It seems many Linux users do not understand Windows 2000 domains very well. This may be by design, of course. And certainly, Windows users tend not to understand the Unix world as much as they should. So, I will try to bridge any gaps, seeming as though in many (most?) real world networks, Windows and Unix/variants are used together. Yeah, Macs too, but I cannot cover it all here!
In order to share files between a Linux system and a Windows system on a Windows 2000 network, configure Samba Server on the Linux system. In a nutshell: configure authentication, set up appropriate user (s) and configure domain/ workgroup information correctly, start the Samba-related services, and then sharing is enabled. From a Windows 2000 PC, in “My Network Places” / formerly “Network Neighborhood”, I can see a Samba folder share. Or, I can do a search from a Windows 2000 Professional PC and locate the Linux system with the Samba share, by searching for Files, then going down to “other items”/computers. More importantly, I can drag and drop, move or copy files at will. Also, printing from Windows 2000 Pro to the Linux PC over the network could come in handy as well. This is only after having created an account on the Linux system that is identical to my Windows 2000 domain account.
——————————————————————————–
Provided are both some sample Webmin screen shots with instructions and the actual file which handles the Samba Server: smb.conf. Remember that file! Also, bear in mind a couple of key points:
•Configuring this server and starting the services will require root privileges on the Red Hat Linux 7.1 system.
•Networking must be in place correctly! This is stating the obvious, but be sure the Linux system can be pinged from the Windows system, and vice versa. Be certain that basic browsing is working WITHIN the Windows network, before starting on getting Linux involved.
•The Domain I am working on here operates in a mixed mode environment. That is, it utilizes both Windows 2000 servers and Windows NT 4 servers to handle domain validation. It is possible that in a highly secured, Native Mode environment (i.e non -Windows NT) that the following instructions will not work. Windows 2000 server security runs the gamut from barely secure to very secure. I am not referring to the issue of bugs and patches here, but instead to DOMAIN security. Windows domain policies can be created in such a way that Samba Server creation could be difficult.
•
In this example I used Red Hat Linux 7.1, Samba Server 2.2.3, and Webmin 0.92. Obviously, using newer or later versions may not be the same, although it could be damn close.
——————————————————————————–
One easy method to work with Samba Server: work through the Webmin Graphical User Interface to configure Samba. This only involves a few steps, although you need Webmin in the first place. Afterward, the smb.conf file can be reviewed as needed. Of course, it can be edited as well using vi or any other editor. Webmin is simply a good-looking front-end to the files involved in Samba Server, amongst numerous other programs. It also aids in completing many other system administration tasks. Red Hat Linux 7.1 comes with Webmin, but it may be best to obtain the latest: http://www.webmin.com .
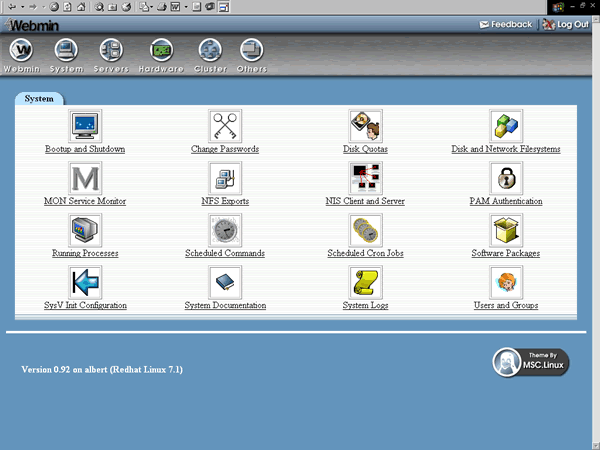
You can simply gunzip the .gzip extension, then tar -xvf the archive. Or use the Red Hat RPM. Full installation instructions here. Read through the Help or ReadMe documents as needed. Open the Webmin interface in your web browser (incoming dead link!): http://albert:10000, in my case (albert being the hostname, port 10000 the default port for Webmin). Log in and begin. Keep in mind, assuming correct networking, this can be done within most web browsers from another workstation on the network. After logging in, this should be visible:

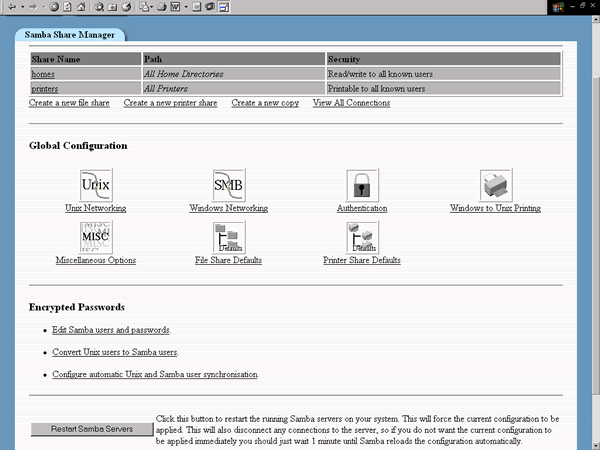
Go to the Servers icon in the upper left. You will then see all the various servers available to configure on the Red Hat 7.1 system. Open the Samba Windows File Sharing link and you will go to the following screen [a little portion from both the top and the bottom did not make the image capture. I captured the most important parts of the screens]:

From within this window, everything can be accomplished.
Follow these steps in Part 2 (next page)

